CRUD REST API application using Node.js, Express.js and PostgreSQL: The Beginner's guide
Introduction
Today I’m going to show you how to create a CRUD (Create, Read/Retrieve, Update and Delete) application using Node.js, Express.js and PostgreSQL. This article will focus heavily on backend.
After you finish this article you will have the knowledge and confidence to start building your own applications! Which you can build frontend on it on your own.
We will start by creating the application structure, install the needed modules, create Express server, add configurations to connect to PostgreSQL, create a database build script, define the routes for the Products, handle the functionality of CRUD operations in controller. And test it with Postman.
What's REST API?
First of all, what's REST API ?
A RESTful API is an architectural style for an application program interface (API) that uses HTTP requests to access and use data. That data can be used to GET, PUT, POST and DELETE data types, which refers to the reading, updating, creating and deleting of operations concerning resources.
RESTful APIs are used by such sites as Amazon, Google, LinkedIn and Twitter.
Now Just to make it clear, the 5 RESTful routes that we are going to implement are in the following table:
| Method | URL | Action |
|---|---|---|
| GET | /api/v1/products | Get all products |
| Get | /api/v1/products/:id | Get a product by id |
| POST | /api/v1/products | Create a product |
| PUT | /api/v1/products/:id | Edit and update a product by id | DELETE | /api/v1/products/:id | Delete a product by id |
the /api/v1 in the URL specifies access to the first version of the web API. If you decided to update to version two, you can do this while still maintaining support for software that uses the first version.
Perquisites
But before you start, you need to have:
As for skills:
- Basic knowledge of Node.js
- Basic knowledge of PostgreSQL
As for tools:
- Node
You can check if you have it by running node -v in terminal, if you don't have it installed then navigate to this Link and install the latest LTS version.
- PostgreSQL
You can check if you have it by running psql --version in terminal, if you don't have it installed then navigate to this Link and download the version that matches your Operating System.
- Postman
Postman is an application used for API testing. and we will be using it to test our API, you can download it from here
- Integrated Development Environment (IDE)
You can use whatever you feel comfortable with, I'll be using Visual Studio Code which you can download from here
Once you are all set up, now we are ready to start!
Application structure
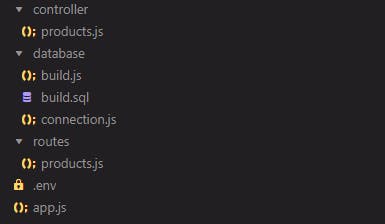
Start by making a new directory and create the following folders and files in it.

We will get into each file and write code in it and explain what it does!
Let's now install the required modules/packages for our application!
Install Packages
to Install packages we need package.json, to initialize it run the following in terminal, make sure to be in the base directory of the project
npm init -y
Now we have the package.json let's install the needed packages by running
npm install express pg dotenv
express Fast, unopinionated, minimalist web framework over Node.
pg Non-blocking PostgreSQL client for Node.js.
dotenv module that loads environment variables from a .env file into process.env.
Once it finishes Let's install a development dependency. Run the following command in your terminal
npm install nodemon --save-dev
- nodemon is a tool that helps develop node.js based applications by automatically restarting the node application when file changes in the directory are detected.
Now we are ready to start writing some code!
Start Express Server
In app.js write the following code
const express = require('express');
const app = express();

const PORT = process.env.PORT || 3000;

/* More Code here */

// Start the server
app.listen(PORT, () => {
  console.log(`Listening on port ${PORT}`);
});
Any more code that will be added in app.js will be added under /* More Code here */ unless I specify otherwise.
to make sure the server is running without problems, Run in your terminal
node app.js
But now if we changed anything in the code we have to restart the server, which is tiresome.
Let's make use of nodemon, in packages.json under "scripts" add the following scripts
    "start": "node app.js",
    "dev": "nodemon app.js"
Now in terminal, Run the following command
npm run dev
The server will be running right now and will be restarting after each save we make!
PostgreSQL Configurations
Now Let's start adding the configurations for our database, but before that we need to create the database itself!
By default, when you install PostgreSQL, a user with the name of postgres is created. So let's login using it.
in the terminal, Run
psql -U postgres
It will ask for a password, enter your password and once you are logged in now can create the database. Run the following
CREATE DATABASE products_api;
Now we have the database, you can check if it was created by running \list and look for it.
Going back to our files let's start adding the configurations.
In the .env file write the following and replace the placeholders with your own configurations
DATABASE_URL=postgres://[user_name]:[password]@[host]:[port]/[database_name]


The host is localhost since we are running it locally
The port for PostgreSQL is 5432 by default
database_name we already named it products_api

for example: [port] is replaced with 5432
Establishing a Connection
Now going to connection.js, write the following code
const {Pool} = require('pg');

// Create a new connection pool

const connection = new Pool({
  //String of connection information
  connectionString: process.env.DATABASE_URL,
  //We can't set it to true, because it's locallly hosted and doesn't support SSL
  ssl: false,
});


// Export the connection pool

module.exports = connection;
You will notice that we are using process.env.DATABASE_URL, since it's a string with the connection information which must be secure.
But right now the application can not read the DATABASE_URL because it's from another file .env, that's why we installed the dotenv, so it can load the enviromental variables from .env and add it to process.env
Now in the app.js, write the following and make sure that it's the first line of code!
require('dotenv').config();
in app.js to test the connection between the server and the database, write the following under /* More Code Here */
//Require the connection to the database
const connection = require('./database/connection');

//Test connection to database
connection.connect(err => {
  if (err) {
    console.error(err);
    return;
  }
  console.log('Connected to database');
});
Now we established connection let's insert some data to our database and test it!
Create a database build script
In build.sql You can add SQL commands as long as you know SQL but for now, write the following
BEGIN;

DROP TABLE IF EXISTS products;

CREATE TABLE products (
  id INTEGER PRIMARY KEY,
  name VARCHAR(255) NOT NULL,
  price INTEGER NOT NULL,
  description TEXT
);

INSERT INTO products (name, price, description) VALUES ('Apple', 100, 'A red fruit'), ('Banana', 200, 'A yellow fruit'), ('Orange', 300, 'An orange fruit');


COMMIT;
And now to execute the SQL commands, in build.js write the following
require('dotenv').config();
const fs = require('fs');
const connection = require('./connection');

// Read the file and parse it
const sqlBuild = fs.readFileSync('./database/build.sql', 'utf8');

// Execute the build script
connection.query(sqlBuild, (err, res) => {
  if (err) {
    console.log(err);
  } else {
    console.log('Database build complete');
  }
});

// End connection to database
connection.end();
Now we finished the build script, go to package.json and in "scripts" add the following script:
"build" : "node database/build.js"
in terminal, Run
npm run build
Great, now the database has some data!
You can check my article about it if you want to learn more about it here
Define Routes
Let's start making our API routes, in routes/products.js write the following:
const router = require('express').Router();
const {
  getAllProducts,
  addProduct,
  getProduct,
  updateProduct,
  deleteProduct,
} = require('../controller/products');


// route is to define the path to the endpoint
router.route('/').get(getAllProducts).post(addProduct);
router.route('/:id').get(getProduct).put(updateProduct).delete(deleteProduct);

//You can also use this way of handling routes!
// router.get('/', getAllProducts);
// router.post('/', addProduct);
// router.get('/:id', getProduct);
// router.put('/:id', updateProduct);
// router.delete('/:id', deleteProduct);


module.exports = router;
The :id is a dynamic parameter that we set to make specified requests
Now let's write the functions in controller/products.js as placeholders so we can write the logic for them as we going!
in controller/products.js add the following code
const connection = require('../database/connection');

const getAllProducts = async (req, res) => {
  res.send('Get all products');
};

const addProduct = async (req, res) => {
  res.send('Add product');
};

const getProduct = async (req, res) => {
  res.send('Get product');
};

const updateProduct = async (req, res) => {
  res.send('Update product');
};

const deleteProduct = async (req, res) => {
  res.send('Delete product');
};

module.exports = {getAllProducts, addProduct, getProduct, updateProduct, deleteProduct};
Now let's handle the Products router that we made, in app.js add the following
  const productsRouter = require('./routes/products');

  app.use('/api/v1/products', productsRouter);
Now each route that we defined in productsRouter will have /api/v1/products in the Url before the path that was defined in the routes itself!
So now the routes are the as same as the routes in the table I showed you at the beginning of the article!
Once we finished the routes in our application, let's add them in Postman!
Testing routes in Postman
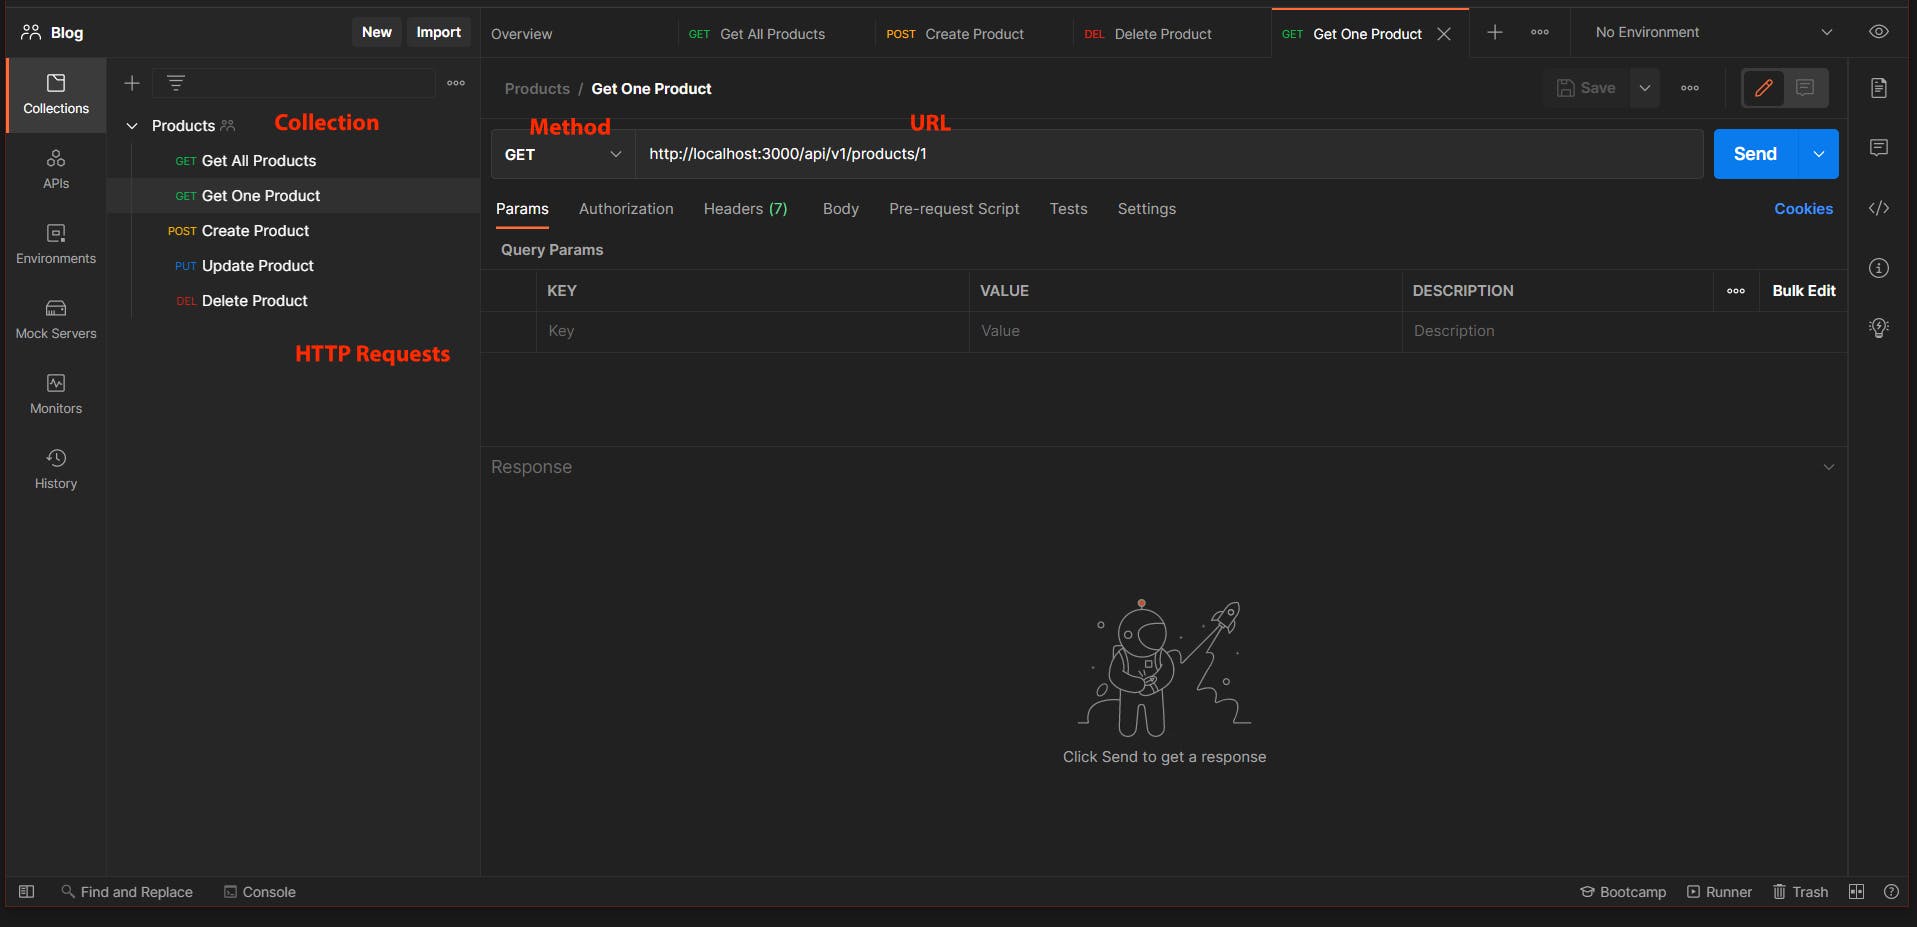
Open up Postman and create a new Collection with Products name.
In the collection, create 5 HTTP Requests as in the table
The end result will be like this

Now to test the routes, Send the Get All Products request, in the response you will get Get all products
Great job! Now let's handle the functions in controller/products.js
CRUD operations in Controller
If you noticed, we are using async in routes that will interact with the database, because accessing a database is an example of an operation which is asynchronous by nature. It means that you have to wait for the results of a query, but while waiting, your program will continue to execute. So it won't stop the program until the query is finished but instead run in the background!
Let's handle each function alone, starting with getAllProducts
getAllProducts
in getAllProducts function, write the following code
  try {
    //Get all products from database
    const products = await connection.query('SELECT * FROM products');

    if (products.rowCount = 0) {
    // 404 is a status code for not found
      return res.status(404).send('No products found');
    }

    //Send products to client
// 200 is a status code for success response
    res.status(200).json(products.rows);
  } catch (err) {
// 500 is a status code for internal server error
    res.status(500).json({error: err.message});
  }
The connection.query returns an object with information about the result of the query, we are interested only in the rows inside of the table.
Now test it in postman, and check the result!
getProduct
Now let's get a product, but to get a product we need a way to identify it and get it, that's when id which is the identifier of the product comes into play.
As we wrote in the routes :id now we set the id of the product we want in the Url and get it.
in getProduct function, write the following
  try {
    //Get id from the request
    const {id} = req.params;

    //Get product from database by id
    // The $1 is a placeholder for the id, which is passed in as a parameter
    const product = await connection.query('SELECT * FROM products WHERE id = $1', [id]);

    //Check if product exists
    if (!product.rows[0]) {
      return res.status(404).send('Product not found');
    }

    //Send product to client
    res.status(200).json(product.rows[0]);

  } catch (err) {
    res.status(500).json({error: err.message});
  }
Now test it in postman, and check the result!
Let's create a product with the POST request!
addProduct
Now we finished with GET method, we want to create a product and insert it into the database. And since we are inserting data You might be wondering where should we write the data to be inserted?
The data will be sent within the request, and since the request is an object in Express, we can access it's properties, one of the properties is body
Right now we are using Postman, so we are going to insert the data as Json.
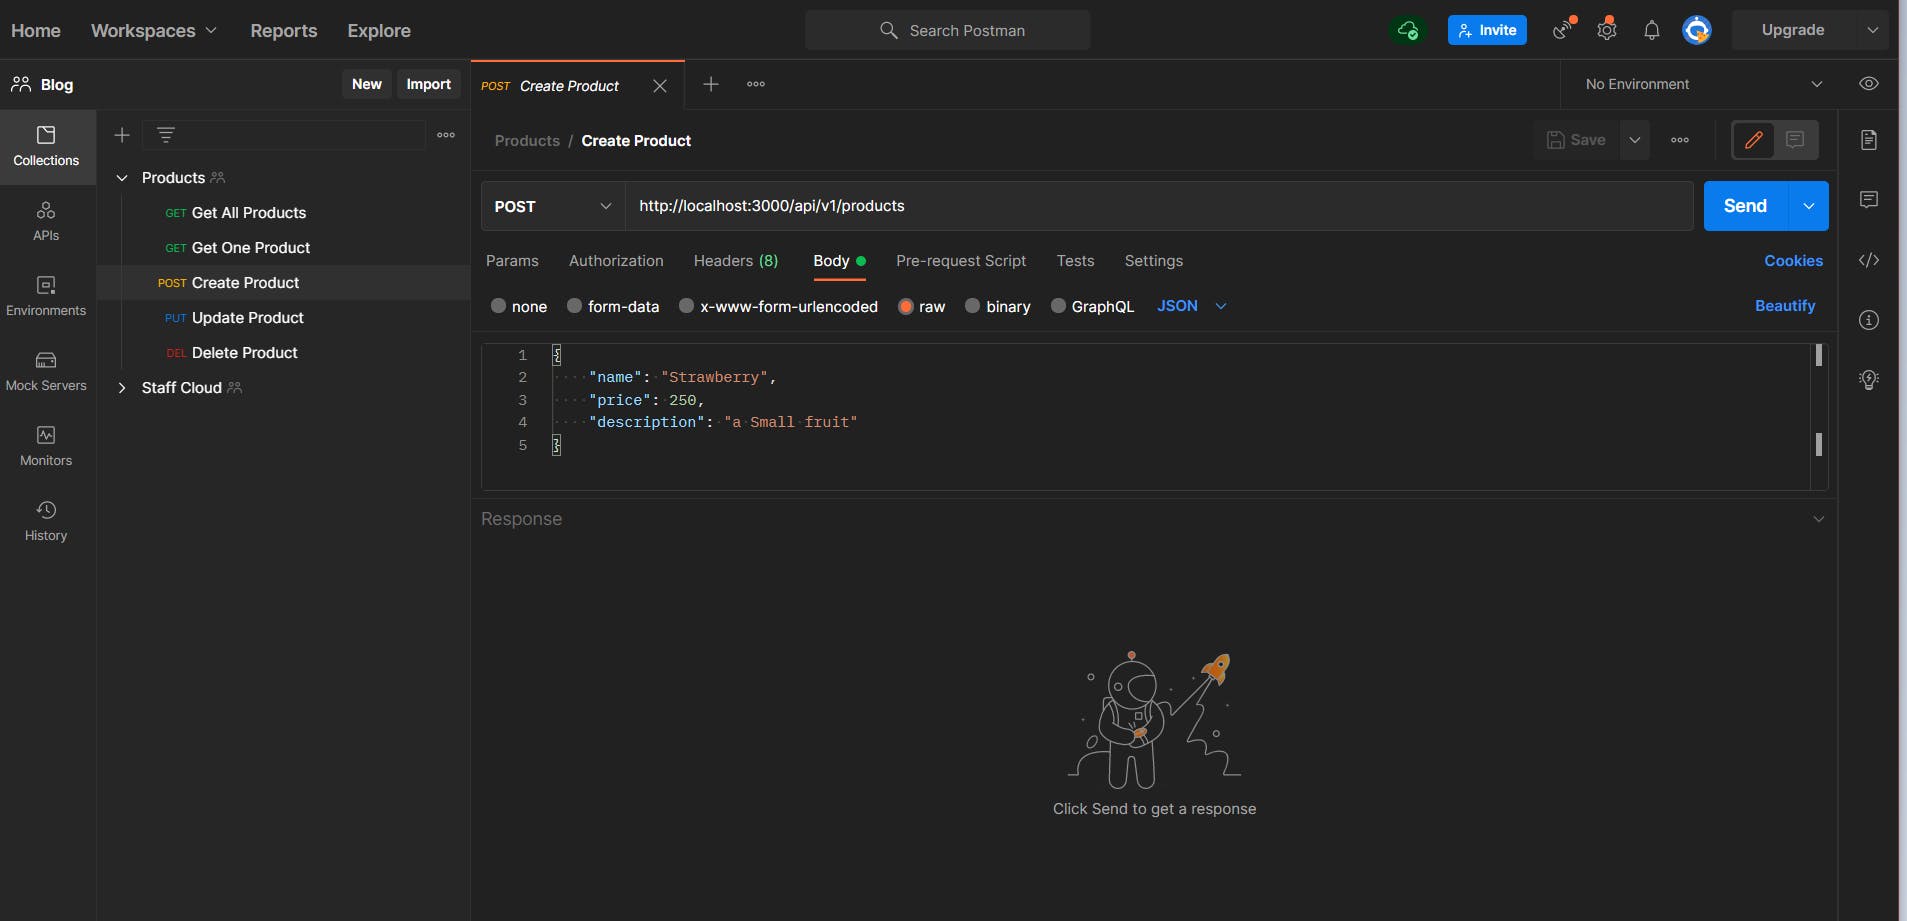
Head back to Postman, in the Create Product request, go to Body, under the body specify it as raw , and instead of text choose JSON
Add the product inputs that we specified (name, price, description). It should end like this

Great! back to our files
We set up the request to be sent, let's handle the function!
But before handling it, remember that we are sending a JSON and it won't be parsed, so we are going to use a built-in middleware to handle this.
Go to app.js and write the following code, make sure to put it above the router!
app.use(express.json());
Now going back to addProduct function, write the following code
  try {
 //Get data from request
  const {name, price, description} = req.body;

  //Check if name and price are provided
  if (!name || !price) {
// 400 is a status code for Bad request due to client side error
    return res.status(400).send('Name and price are required');
  }

  //Check if price is a number
  if (isNaN(price)) {
    return res.status(400).send('Price must be a number');
  }

    //Insert a new product into database, and return it
    const product = await connection.query(
      'INSERT INTO products (name, price, description) VALUES ($1, $2, $3) RETURNING *',
      [name, price, description]
    );

    //Send product to client
// 201 is a status code for Created, since we are creating a new product.
    res.status(201).json({
      message: 'Product added',
      product: product.rows[0],
    });
  } catch (err) {
    //If error, send error message
    res.status(500).json({error: err.message});
  }
Now test it with Postman, and it should return that you added a new product!
updateProduct
Updating a product is a bit tricky, since the user might not want to update all fields. So what we are going to do is to get the product that the user asked for, check the fields that are provided, and update the product as it's provided.
in updateProduct function, write the following code
try {
    //Get id from the request
    const {id} = req.params;

    //Get data from request
    const {name, price, description} = req.body;

    // Get the existing product from the database
    const existedProduct = await connection.query('SELECT * FROM products WHERE id = $1', [
      id,
    ]);

    // Check if product exists
    if (!existedProduct.rows[0]) {
      return res.status(404).send('Product not found');
    }

    // If name is provided, update the name oherwise keep the old name
    const nameToUpdate = name ? name : existedProduct.rows[0].name;

    // If price is provided, update the price oherwise keep the old price
    const priceToUpdate = price ? price : existedProduct.rows[0].price;

    // If description is provided, update the description oherwise keep the old description
    const descriptionToUpdate = description ? description : existedProduct.rows[0].description;

    const result = await connection.query(
      'UPDATE products SET name = $1, price = $2, description = $3 WHERE id = $4 RETURNING *',
      [nameToUpdate, priceToUpdate, descriptionToUpdate, id]
    );

    res.status(200).json({
      message: 'Product updated',
      product: result.rows[0],
    });
  } catch (err) {
    res.status(500).json({error: err.message});
  }
In Postman, make the same setup that we used for Creating a product, but Add an id in the url and the method would be PUT, and try to update a product!
deleteProduct
Great job following till now, as a reward I left the deleteProduct to the end since it's the easiest one! All we have to do is check for product if exists, and delete it.
in deleteProduct function, write the following code
  try {
    //Get id from the request
    const {id} = req.params;

    //Get product from database by id
    const product = await connection.query('SELECT * FROM products WHERE id = $1', [id]);

    //Check if product exists
    if (!product.rows[0]) {
      return res.status(404).send('Product not found');
    }

    //Delete product from database
    await connection.query('DELETE FROM products WHERE id = $1', [id]);

    //Send response with 204 (no content) status code
    res.status(204).send();
  } catch (err) {
    res.status(500).json({error: err.message});
  }
If you tested it in Postman, you won't get anything even if you sent a response with a message as long as the status code is 204, it indicates that the request was successfully done, and the status code it for No Content because we deleted a product and there's nothing to return.
Great job making it to the end!
Conclusion
As you saw in the guide, Creating REST API applications with the basic CRUD operations using Node.js, Express.js and PostgreSQL is really easy when you get comfortable of the flow.
Thank you that you reached this point, now you can start creating your own applications! But before that, make sure to leave a quick comment to let me know what you think of ‘CRUD REST API application using Node.js, Express.js and PostgreSQL: The Beginner's guide'.
